
How to Download Your Blinko QR Sticker Design
Step-by-step guide to downloading your custom Blinko QR code sticker from the business portal — choose the right size and format to print and display at your cafe, salon, restaurant, or retail shop.
Blinko Team
Blinko Local
Your Blinko sticker is one of the most effective tools for growing your customer base. Every person who walks past your door is a potential follower — and a well-placed sticker with your QR code is how they connect. This guide walks you through downloading your design and getting it ready to print.
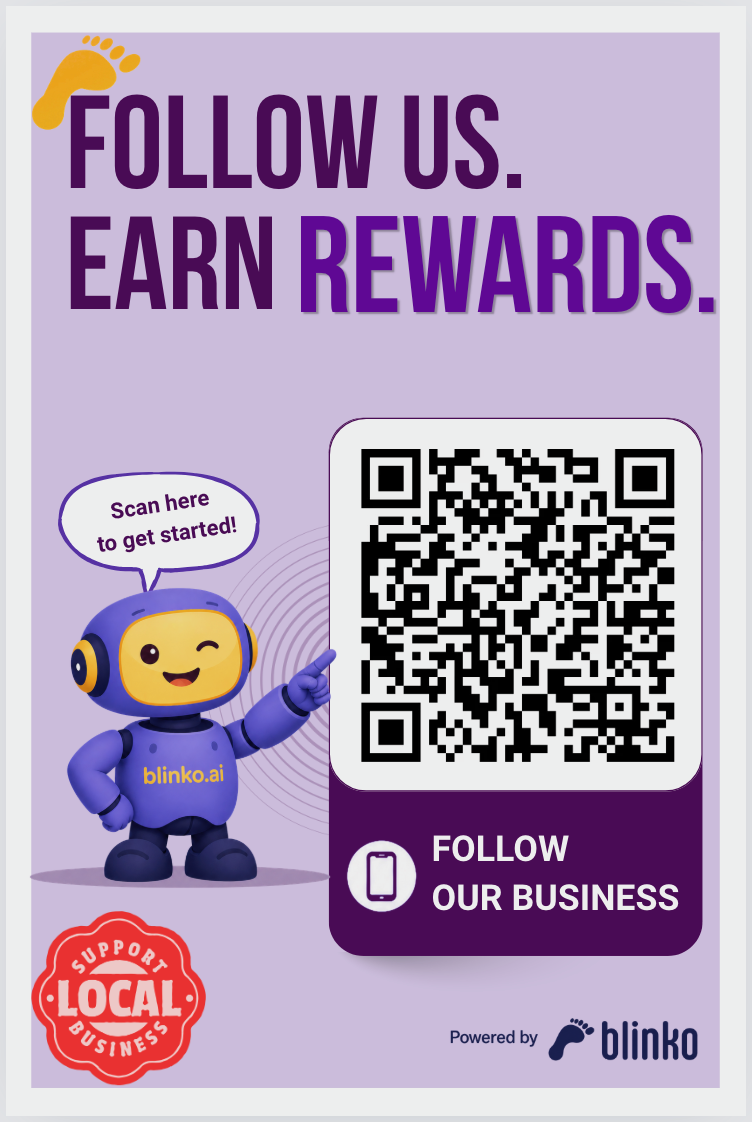
What is the Blinko sticker?
When a customer scans the QR code on your Blinko sticker, they are taken directly to your business profile on the Blinko app. With one tap they follow your business and start earning rewards on every visit — no account creation required, no email address, no friction.
The sticker is generated specifically for your business. The QR code embedded in it is unique to you, so every scan counts as a check-in to your location.
Before you start
Make sure you have:
- An active Blinko Local account at local.blinko.ai
- Your business set up and at least one campaign live
- A way to print it — either a local print shop or a home printer for a temporary setup
See our companion guide for printing: Where to Get Your Blinko Sticker Printed (and What to Tell Them)
Step 1 — Log in to the Blinko Local portal
Go to local.blinko.ai and sign in with your business account.
Step 2 — Open "QR & Sticker" in the left navigation
In the left sidebar, click QR & Sticker. This is where your custom sticker design lives, with your unique QR code already embedded and ready to download.
Step 3 — Choose your sticker size
Blinko offers two print-ready sizes:
| Size | Best for |
|---|---|
| 5 × 7 inches | Counter displays, table tents, menus, interior walls |
| 6 × 9 inches | Window displays, entrance doors, larger wall placements |
Not sure which size to pick? A good rule of thumb: if customers will be standing close — at a counter or seated at a table — the 5×7 is plenty. If the sticker will be on a door or window where customers approach from a few feet away, go with the 6×9 for better visibility.
You can download both sizes — there is no limit.
5 × 7 inches
6 × 9 inches
Step 4 — Download your file
Click the Download button for the size you want. You will receive a high-resolution PNG file — print-ready at 300 DPI, sized exactly to the dimensions shown.
Tip: Save the file somewhere easy to find — your Desktop or a dedicated "Blinko" folder. You will need to attach it when you contact your print shop.
Step 5 — Send it to a local print shop
Your file is ready to print as-is. You do not need to resize, reformat, or edit anything.
The next step is getting it printed as a vinyl sticker — waterproof, UV-resistant, and built to last at your business location for years. Our full guide covers where to find a print shop near you, exactly what to ask for, and a ready-to-send email template:
👉 Where to Get Your Blinko Sticker Printed (and What to Tell Them)
Step 6 — Scan the QR code yourself first
Before you place the sticker anywhere, scan it with your own phone. This does two things at once: it confirms the QR code works correctly, and it gives you the exact experience your customers will have.
What happens the first time you scan
Point your phone's camera at the QR code. On most phones, a notification or banner will appear — tap it. If this is your first time, your phone will take you to the App Store or Google Play to download the Blinko Spots app.
Download and install the Blinko Spots app — it is free for customers.
The Blinko Spots app is the consumer side of Blinko — it is the app your customers use to follow businesses, collect stamps, and redeem rewards. As a business owner, having it installed lets you see exactly what your customers see.
After installing Blinko Spots — scan again
Once the app is installed, open it and scan the QR code again (or tap the link from your camera). This time, you will land directly on your business profile inside the app.
Here is what you will see — and what your customers will see:
- Your business name, category, and location — pulled automatically from your Google Places listing
- Your active campaigns — every stamp card, welcome offer, and discount coupon you have published appears here, ready to be tapped
- A "Follow" button — tapping it enrolls you (or any customer) as a follower and triggers your Welcome Offer if you have one active
- Rewards and progress — if you tap Follow and have a stamp card running, you will see your stamp card with one stamp already earned from this visit
Why this matters
Scanning your own QR code is the fastest way to validate everything is working — campaigns are live, the welcome offer fires, stamps count correctly. But it also gives you something more valuable: you will see your business the way a first-time customer sees it.
If your campaigns look compelling and clear, a real customer will feel the same way. If something looks off — a campaign description that is confusing, a reward that does not feel worth it — you will catch it before your customers do.
Pro tip: Ask a staff member to scan and follow your business too. Have them go through the stamp card flow a few times so they can answer customers' questions confidently: "Yes, I have tried it — here is how it works."
Where to place your sticker
Once you have your sticker in hand, placement matters. The best spots are wherever customers naturally pause:
- Entrance door — eye level, visible from outside
- Counter or register — right where the transaction happens
- Tables — ideal for restaurants and cafes
- Menu — printed or physical
- Window — draws walk-by traffic
The more visible your sticker, the more check-ins you will get. Businesses that place stickers in three or more locations consistently see higher follower enrollment.
Frequently asked questions
Can I print the sticker at home? Yes — a high-quality inkjet or laser printer on glossy photo paper works for a temporary setup. For long-term placement (especially near doors and windows), vinyl from a print shop is strongly recommended. It is waterproof, UV-resistant, and will not curl or fade.
Can I use the sticker outdoors? Yes, as long as you request weatherproof vinyl with UV laminate from your print shop. Standard vinyl without laminate will fade in direct sunlight within a few months.
My QR code looks pixelated when I zoom in — is that normal? Yes. QR codes may appear pixelated on screen at extreme zoom. They will print sharply at 300 DPI. Always test-scan the printed sticker before placing it permanently.
Do I need to re-download the file if I change my campaigns? No. The QR code points to your business profile, not to any specific campaign. It stays valid regardless of what campaigns you run or change.
Ready to turn walk-ins into repeat customers?
Join hundreds of local businesses using Blinko to build lasting loyalty — no apps, no friction.
Get Started Freearrow_forwardReady to turn walk-ins into repeat customers?
Join hundreds of local businesses using Blinko to build lasting loyalty — no apps, no friction.
Get Started Freearrow_forwardDiscover local businesses on Blinko Spots
Browse restaurants, cafes, shops, and more near you — all in one place.
Blinko Team
The Blinko Local team helps small businesses grow with smart loyalty tools and local marketing strategies.